Warning: Do NOT attempt to do any of these exercises without first discussing them with your doctor!!!! |
|||| Level One Exercises |||| Level Two Exercises |||| Doug's Core Program ||||
 |
 |
|
ALWAYS START YOU WORK-OUT WITH THIS STRETCH. Simply get in the above position and GENTLY pull your knee to your chest and hold for a count of 20 to 30 seconds. Slowly lower the leg and repeat the other side. Do each leg 3 times. Do NOT force it or cause yourself any significant lower back pain. It's also easy to stretch the Piriformis Muscle in the 'up' position (grey leg). All you do is move your left heal toward the right knee (rotates the knee and hip) while you keep your knee in about the same place. DO NOT do this (piri stretch) if you have bad knees! |
Since disc patients lose their ability to 'Reflex-Contract' their core spinal-stabilizers, learning how to 'manually' accomplish this is a must! Here's how: Simply suck / contract your belly-button downward (NOT by deeply inhaling!) and tighten your buttock muscles and your anus muscle (as in trying desperately to hold in a threatening fart!) SIMULTANEOUSLY and HOLD. IF you're really in pain (acute) DO NOT DO THE BUTT AND ANUS MUSCLE PORTION! 1 to 3 Sets of 5 to 15 seconds is plenty. |
|
 |
|
|
| Assume the above position only put the grey arm straight over-head and the white arm down by your side. Now, tighten your tummy (and butt if your not too sore) to lock your spine in place. Slowly lift the grey arm upward like a railroad crossing-gate; keep it moving until it rests on the ground next to your side. SIMULTANEOUSLY do the same thing with white arm (right) ONLY IN THE OPPOSITE DIRECTION. Both arms are going in opposite directions. 1 to 3 Sets of 5 to 20 repetitions with each leg is enough. | Assume the above position only the grey leg is down (like the white). Tighten your tummy and SLOWLY raise your knee toward your chest. Keep that tummy tight as you lower it back down to the ground. Repeat with the other limb. |
|
 |
 |
|
| For our final stomach exercise, lets combine the above two exercises, only we will NOT go all the way. Tighten the tummy and SLOWLY (like a Kung Fu master) lift the left arm and right leg SIMULTANEOUSLY. Bring them to the mid-way point (12 O'clock), hold for 5 to 15 seconds, and return them to their original positions. Repeat other side. 1 to 3 Sets of 5 to 20 repetitions with each leg is enough. | Take two or even three pillows and lie on top of them as shown above. Slowly raise your left leg (keeping it straight) upward and HOLD it at the top for 5 to 20 seconds. Slowly lower and repeat with the other lower limb. Only raise your leg to a comfortable height. DON'T go so high that your causing a lot of pain. You don't have to go very high for this to be effective. 1 to 3 Sets of 5 to 20 repetitions with each leg is enough. |
|
 |
 |
|
DO NOT DO THIS ONE IF YOU HAVE A BAD NECK! Take two or even three pillows and lie on top of them as shown above. Note that the pillows are more forward (on the chest) than compared to the 'Prone Leg Extensions'. Also note that I use a little pad for the forehead. Slowly raise your left arm (keeping it straight) upward and HOLD it at the top for 5 to 20 seconds. Slowly lower and repeat with the other arm. Only raise your arm to a comfortable height. You don't have to go very high for this to be effective. 1 to 3 Sets of 5 to 20 repetitions with each arm is enough. |
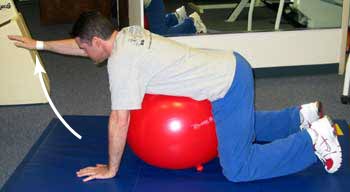
Here's an alternative to the exercise on the left. Simply mount the Gym Ball as shown above. Note that both knees touch the ground. Next Slowly raise and extend your right arm and HOLD it at the top for 5 to 20 seconds. Slowly lower and repeat with the other arm. Only raise your arm to a comfortable height. You don't have to go very high for this to be effective. 1 to 3 Sets of 5 to 20 repetitions with each arm is enough. | |
 |
 |
|
| DO NOT DO THIS ONE IF YOU HAVE A BAD NECK! Take two or even three pillows and lie on top of them as shown above. Simultaneously lift the white arm (left) and grey leg (right) slowly upward. Don't force it! just go as high as you can. Hold this top position for 5 to 20 seconds and then lower. Repeat the other limb pair. 1 to 3 sets of 5 to 20 repetitions with each limb pain (white arm - grey leg) is good enough. | Start in the above position (grey). Make sure your knees are spread fairly wide apart so you have a good base. You can put some pillows under your knees to boost yourself up if need be. If you have neck problems fold your arms across your chest instead of the 'hands-behind-head position. SLOWLY lift your chest off the ball. DON'T TRY TO GET TO HIGH OFF THE BALL at first. A little bit of 'lift' goes a long way. HOLD that top position for 3 to 10 seconds and then slowly lower your self back to the grey position. 1 to 3 sets of 5 to 20 repetitions will be enough. | |
 |
||
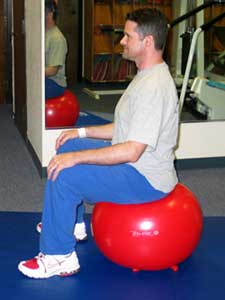
| While keeping your low back in the neutral position, simply sit for 5 to 20 minutes while watching TV. You may bounce gently, and slightly roll from side to side. Just 'play', but make sure you keep that neutral spine. |
Top | Level 2 Exercise | Exercise Main Page
© Copyright 2002 – 2005 by Dr. Douglas M. Gillard DC - All rights reserved
